How To Recanvas A Canoe With Dacron
Recanvasing can be simplified using heat-srink Dacron
| Click for printable version (discludes header and navigation bar; opens in new window) | ||
How to RECANVAS an old CANOE? Try a new simpler method You have an old wood canoe...the wood is in fair shape but the canvas has had it. There is no way that you can imagine stretching new canvas with a come-along or some other brute force to fit the hull curves. A modern material works like shrink wrap and presto a rejuvenated boat! Covering with heat shrink Dacron fabric has these advantages:
Carefully remove the rub rails, keel and brass trim cutwaters. (You will re-use these or need them to make patterns). Strip off the old canvas, gently so as to not pry off any hull planking. Repair or replace any damaged wood. West System epoxy or "Git"-Rot can be used to toughen any punky or split areas. At this point it might be worth your while to strip off the interior varnish and re-do it. There are paint removers that work by hosing with water to remove the chemically loosened residue. Tighten any loose nails that might be protruding; smooth all irregularities and apply a coat of varnish on the outside. Tools
Required: STEP
1—MEASURE The Dacron has a fine texture that will not hide bumps so examine all of the hull for imperfections and make them fair. Because the fabric is heat shrunk, it will bridge over hollows. That is OK for small dimples; however large depressions should be filled with wood dough or a mix of fine sawdust and epoxy. This fabric is applied with adhesive transfer tape along the gunwales and stems, which eliminates tacks. Actually it is hot melt glue in tape form and that is where we start. STEP
2—SET THE HEAT Prepare the iron by setting it on a scrap corner of the Dacron and slowly raise the thermostat till the fabric starts shrinking. That is about 225-250 Deg. (note this setting) This is one of the features that is forgiving. The Dacron starts to melt at about 425 Deg. and gives off a warning with wafts of steam coming off the surface first. That is over 100 degrees safety margin. You might care to do some experimenting with the actual heat setting. In which case you can make up a rig with a roll of paper towels and a candy thermometer. Squash the roll a little to make a sort of nest with the business front end of the iron and set the thermometer bulb under the iron and let it sit until the temperature stabilizes make a reading. Now you see how to do it so mark settings on the iron of :
While you are setting the temperature it is a good time to clean the bottom of the iron of any residual crud. This done by setting to the 350 degree temperature and scrub in a vigorous manor on some clean white paper or scrap Dacron. If stains rub off, it needed the cleaning. This glue has a keeper paper on one side, the textured side is the adhesive. All that you have to do is hold the tape in place and press the tip of a hot iron, set @ 225 deg. on it in spots every 2". It will melt and stick to the wood. Now remove the keeper and it is ready for the Dacron. It is a good idea to a test on a short scrap piece of wood. With the boat upside down on saw horses or whatever, you need to apply the HeatnBond tape along the bottom edge of the gunwale plank, around the edge of transom (if a square stern), keelson and at the stem. This means both sides and front face (under where the cut water goes) STEP
3—APPLY THE DACRON With the iron still set at the shrinking temp. start ironing the Dacron onto the HeatnBond tape along the Gunwales. Work in the center and go back and forth from side to side. Press firmly, with the iron and hold it in one spot for about 3 seconds until the adhesive shows a translucency and feels waxy. Now be sure that you do some shrinking at the same time. Here it may take some heat adjustment because it is important to shrink as you go. It must lay flat with no overlaps so shrink plenty as you go. Always pull the excess fabric edge down; never towards the ends as you iron. It is right here that you can see why you must heat with an iron, not a heat gun! Don’t worry about any wrinkles or puckers along side of the gunwale, you will get them later. Just keep pulling down as much as possible. There is a temptation to pull towards the end of the boat to get rid of a wrinkle. resist that urge it only makes a larger wrinkle ahead of you.
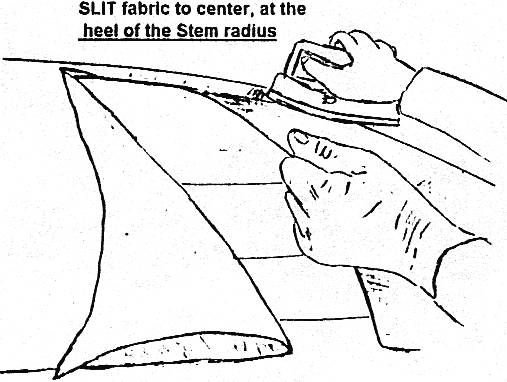
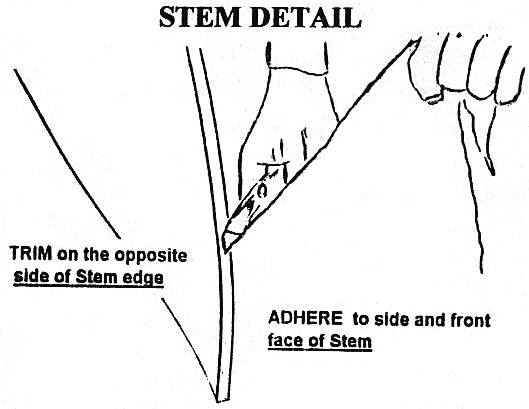
Stop gluing when you get to about 6" from the ends. Remember that I told you that these materials are very forgiving. The tape glue has very good shear strength and that is how it is loaded on the boat; however it has low peel strength. Now is the time to check your work. If something doesn’t look right you can peel it off in any area and re-do it. It may need some more tape. At this point you can trim off the excess material on each side of the stem, leave 4-6" extra for overlap. Slit the material on the center line to about 1" short of the point where the curvatur starts. Work on one side and front face of the stem starting at the end of the slit. Adhere it to the side and front face. Trim off the excess so that it is not lapping on the far side. As you approach the gunwale, glue that last 6" to close the gap with glue all around. SLIT FABRIC AT STEM
Add some more heat tape at the stem to cover the Dacron where the second side will land, just the stem front face. Now complete the second side the same as the first and trim off the Dacron to the edge of the front face.
STEP
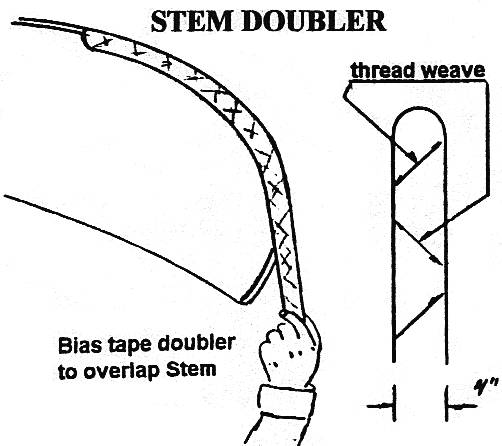
4—SHRINK THE SKIN One thing to watch out for is to not run the iron on top of a wrinkle and press a fold...they are hard to remove. Some patience with the tip of the iron will get rid of the fold. You will find that if you sweep the iron lightly over the flat areas, wrinkles will pull out of other places. Don’t over do shrinking; just do it enough to get it smooth. Work in a well lit area and look at reflections on the skin from different angles to spot irregularities. Now set the HeatnBond tape along the keelson. Stem Doubler This is is an overlay piece of fabric to reinforce the Stem...not necessary but a nice touch. Pinking Shears really should be used here. Cut a piece of scrap fabric, on a 45 deg. bias, about 4" wide and about 1" longer than the overlap area at the stem. Make a half circle round on one end. For appearance sake it is quite important that it have pinked edges. Stick a strip of adhesive tape down the stem, starting with a 1" overlap on the slit cut.
Now adhere the doubler in one small 1/2" dot at the beginning of the tape. Next you pull on the other end and observe how it stretches on the bias to fit flat against a compound curve. Keep it centered as you pull it down and iron it to the stem front face. Mark the edges with masking tape. Then one side at a time, carefully lift the fabric back so that you can apply some heat tape. Cut patterns from sheet stock. Lay the cloth back in place and set the adhesive with the iron at a no shrink setting. STEP
5—SEALING THE DACRON The surface can be toughened with a couple of overlay coats of exterior /marine water base varnish. (I suggest Aqua Coat) A Silver Coat? This is an aircraft terminology and is all about UV Degradation. I have said that the Dacron will not rot. That is true but UV will degrade unprotected fabric at a rate of 70% of its strength in less than one year. If you store the boat in a barn or keep it covered with a black poly tarp there is no problem. The best solution is to start the sealing finish with three silver coats. This is done with aluminum filled paint.(Rust Oleum) It is aluminum paste flakes that are the pigment. The flakes reflect the UV rays and provide an effective barrier that protects the fabric. Three coats is probably enough however; I suggest that you make up a square test panel of some 2x2 stock frame and fabric cover it. The trick is to hold a 60 watt bulb behind a painted panel. When you can’t see the light show through it has enough paint One word of caution about the oil based finishes, they have a tendency to loosen and lift the HeatnBond adhesive. Don’t lather it all over the adhesive areas. Brush lightly will probably be OK on the 1st coat. When you replace the exterior parts, set them in bedding compound (3M 5200 is recommended) or thickened epoxy. This is to avoid leaks into the woodwork. REPAIRS SOURCES
OF SUPPLIES: Aqua Coat from:
Sterling-Clark-Lurton Co. Rust Oleum Aluminum Benjamin Moore
& Co. There is a very fancy web site: www.benjaminmoore.com It even has street maps to help you find your local dealer. You can also call 1-800-344-0400 HEATnBOND (hot
melt adhesive transfer tape) 10 Yd. Roll @ $2.00 + P&H From: Monfort
Associates 50 Haskell Road Westport Maine 04578 |
||

Copyright 2002-2015 Monfort
Associates. |
|||||||||||
|