How To Make a Jiffy-Sail
Use Tyvek to create an inexpensive sail
| Click for printable version (discludes header and navigation bar; opens in new window) | ||
The
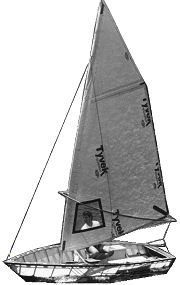
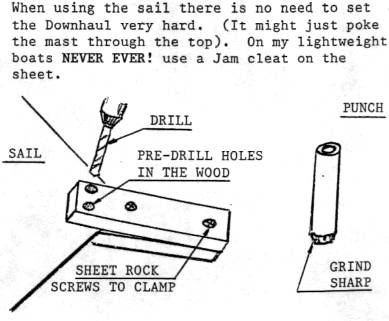
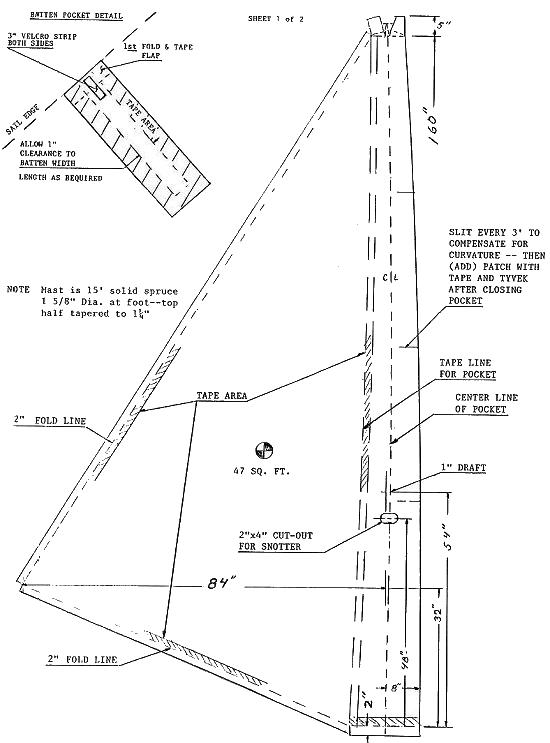
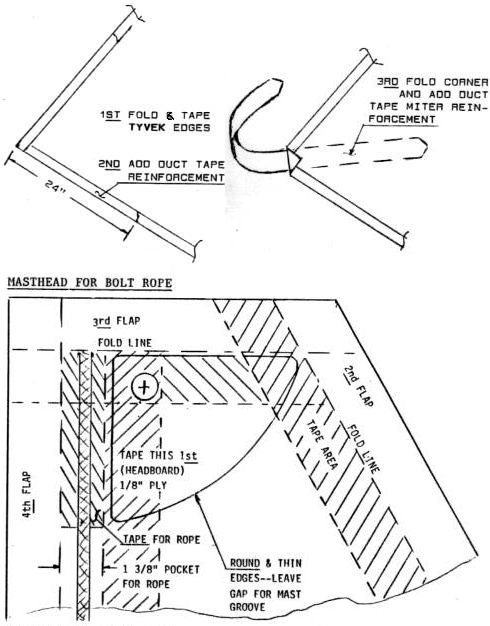
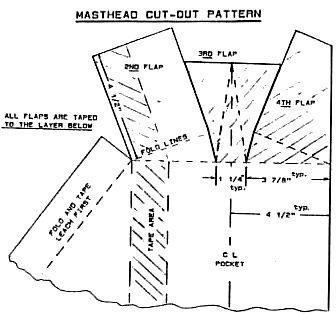
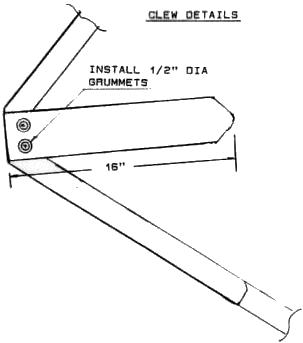
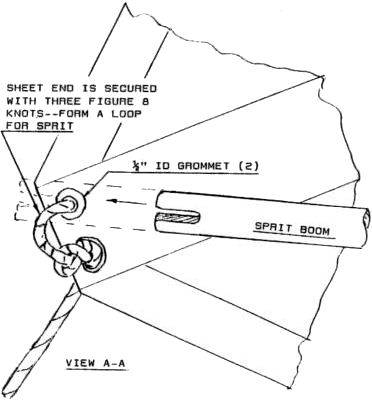
Blivit 13 with a Jiffy-Sail: Tyvek is that tough plastic paper stuff used for the envelopes that you can't tear. Mainly it is used for house wrap on building projects. I've seen it stapled to stud walls out in the wind and weather, exposed for months. It is a breathable material, to stop the wind but let the moisture out. All of the above plus the stretch resistance should make it ideal for a cheap and dirty JIFFY-SAIL ... Will it work? The answer is a BIG YES! D.I.Y. sails are a natural companion to D.I.Y. boats, especially when they are so easy to make. The fact that it comes in a 9-ft. wide roll means that a small sail can be made without joints. The price is right, less than $1.00 per ft. for the 9ft wide material. There is one hitch...most of the lumberyards are reluctant to sell less than a full roll at about $150.00. You can always go to a friendly builder and buy a few feet from him. Another option is to form a small co-op with some of the guys from the Club who would also like to experiment with sail making. The actual construction is almost too simple to explain. No sewing or gluing is required. It is simply a matter of using some double stick carpet tape to secure a fold along the foot and leach. A pocket is formed to slip over the mast, also secured with the tape. I used some strips of duct tape to reinforce the high stress areas where grommets were inserted at the clew to attach the sheet...the same deal for the down haul. Why mess around with cheap sails? Well, my reason was that I wanted to try a larger sail area for light air conditions on the Classic 12. Being reluctant to spring for another store bought job combined with my nature to innovate is reason enough to try something different. How did the experiment turn out? I might be prejudiced, but I would say the results were terrific! The larger sail really livened up the performance of the boat. Most important, nothing let go. The tape joints held up just fine and no tears developed in the Tyvek. One disadvantage is the stuff is rather stiff. Creases sort of become permanent pressed, however no harm seems to come of it. Another characteristic, perhaps a disadvantage is that it is noisy as the Devil. In a way this is advantageous, when the sail is drawing right it is quiet. As soon as it luffs there is a rustle & rattle, a great tell tale. Let it lie free in the wind and the noise will really wake you up. I'm convinced that it will be serviceable for a good long time. Perhaps the best testimonial to its endurance is a 500-mile round trip to Mystic, at 60 MPH on the top of my Blazer. It was wrapped around the mast & tied down. At one point I was aware of an awful lot of flapping, so I stopped and tied some more rope around the loose stuff. No damage was apparently done but the flapping didn't seem too healthy. A 2nd generation update to experiment some more, a larger (70-sq. ft.) sail is working just fine on the new BLIVIT 13. This is still cut from one piece of material off the 9 ft width. It has a batten pocket that consists of a piece of Tyvek taped onto one side of the sail. A 6" strip of VELCRO holds the batten in the pocket quite nicely. This permitted building a 9" roach in the leach of the sail for more area and better set. The 10-mil Mylar window was just stuck in place with the same double stick carpet tape. This sail has a 2" draft built into the luff edge. I simplified the peak and deleted all those flaps and folds...just used some duct tape and grommets, same as the downhaul detail. The end result was sort of like a WIND SURFER rig with stays. After one days sailing I realized that I bad to be able to lower the sail without striking the rig. This meant patching the holes cut for the rigging; then sliding a 5/16" braid bolt rope into the mast pocket. Now I had to build a luff groove onto the mast. Sail track & slides would have also worked. Taking the mast out of the pocket left the peak sort of floppy so I taped a 1/8" ply headboard to fill up the top of the pocket. TURF TAPE is double sided glass reinforced outdoor carpet tape, 2" x 75-ft. roll, manufactured by: Custom Tapes Inc., Harwood Heights, Chicago IL 60656 (312) 867-6060 from: TruValue hardware stores. The hardest part of making one of these Sails is laying out the shape. You need a flat smooth surface (Loft) like a playroom or whatever. I used a straight wood batten as an aid to drawing lines on the Tyvek with a pencil. The hard part comes in the crawling around on your hands and knees (use kneepads). Now I have stated that the nature of this project was experimental. I tried to build draft to the sail by bending the leading edge forward 1" as shown on the sketch and this is where the batten is used. This seemed to work okay however the results were not too certain. The mast was quite bendy, which, of course, as an effect on the sail shape. Getting back to laying out the shape. The mast pocket is tapered from the C/L starting at 8" to 4 1/2" at the top. Start by drawing the swept forward centerline. Then draw the cut line, paying attention to following the same sweeping curve as the centerline. Now (about every 16") measure the distance from the C/L to the cut and transfer that same measurement back from the C/L to the tapeline. Then draw that line. The folds that create a pocket at the top might seem a little confusing; if they do, simply make a trial top section pattern with some heavy brown craft paper to test out the way it works. This pattern can then be used to layout the actual sail. The completion of the layout is now too simple to spend much time explaining. Just make the cut line distance from the foot and leach fold line, the same as the tape width (1 1/2" - 2"). I used a metal level as a straight edge, running the top of my thumbnail along the edge to set a crease to make the fold. Probably two sets of hands would be easier while applying the tape 'cause it is mighty sticky. If it starts to run away from the line, don't try to lift it from the Tyvek, just cut it off and start again. Lifting seems to pick up some of the material, which will mess up the bond. Lay down the folds, starting at the base; then do the foot and leach. Before closing the mast pocket add some duct tape for the down haul grommets. (2) 32" pieces 2" wide were used. Center them about 2" on each side of the pocket C/L. They wrap from the inside around to the outside of the base. The top of the pocket is next, then do the main pocket in sections from slit to slit. This accommodates the curvature at the leading edge. A little bit of scrap material with some tape on it makes a good patch to cover the slits. You could use Duct Tape here; however, the white Tyvek becomes almost invisible. You have just learned how to make a repair if you should have an accident! The clew is done by making a miter fold about 3 1/2" wide and taped in place. Then (add) 3" wide duct tape around the corner extending about 24" on each side (foot and leach). This wraps the edge and is on each side of the sail. Another 32" piece of 3" tape is used to bisect the angle and wrap the corner. (See the sketch) Now take a rag and bunch it up, then rub it hard over all of the taped areas to sort of "set" the tape. The toughest load on the sail is at the clew. I've used double 1/2" grommets and they show no tendency to pullout. They are in 1" and spaced apart 1 1/4" on centers. I can't tell you how to set the grommets without an installing tool. A good hardware store carries kits with tool & grommets for about $12.00. Now that is a lot to spend on a $10.00 sail...just think of it as an investment in a tool that you will be able to use for years. The holes for the grommets take a little doing because it is important that the holes be round with smooth edges. A punch can be made with a piece of pipe or tubing sharpened on one end. (See sketch) Another method is with a drill fixture made with a couple of hardwood blocks as shown. When using the sail there is no need to set the downhaul very hard. (It might just poke the mast through the top). On my lightweight boats NEVER EVER use a Jam cleat on the sheet!
(This image has been scaled down slightly to better
fit your screen and printer) (These images have been re-arranged (but not altered) to better fit your screen and printer)
Tyvek is DuPont's registered trademark for spunbonded olefin house-wrap |
||

Copyright 2002-2015 Monfort
Associates. |
|||||||||||
|